
Soak & Dehydrate Those Nuts & Make Some Butta
- Bethany Brown

- Nov 9, 2019
- 7 min read
Updated: Sep 7, 2021

Thank goodness, I fixed my food processor! Now, before you get to thinking I’m some small engine repair genius, it was just a misplaced spring. Boing! Back in place. It is as old and trusty as my marriage, so it has served me well, but I was planning on it blessing me for many years to come (same as for my marriage)! I depend on this handy kitchen gadget for so many jobs, but the biggest one would have to be making nut butter. (I can’t tell you how many times autocorrect has wanted me to call this but(t) butter.)
Why do I make my own nut butter when it is so much more convenient to pick a giant pre-made jar of it off the warehouse store shelf? Also, why nut butter? Isn’t peanut butter the inexpensive goo that holds together our childhoods?
Peanuts, while carrying quite a nutritional punch, are not nuts, but legumes. Legumes, particularly peanuts, are common carriers of Aflatoxin, a type of mold that is considered a human carcinogen. Aflatoxin exists in crops grown with the perfect combination of decaying foods, high moisture, and high temperatures, of which peanuts and corn are the top contenders. (1). It is common for those allergic to peanuts to be reacting to not the actual peanut, but to the toxic mold. Peanuts also contain a high amount of inflammatory omega-6s, which you want to avoid as much as possible.
While my sensitivity to mold (and my overall dislike for carcinogens) gets in the way of my kids' lunchtime staple of the classic PB&J, they get plenty of APB&SFFJ! (You know, Almond Pecan Butter with Sugar-Free Freezer Jam <- recipe!) My favorite everyday nut butter blend is made of equal parts pecans and almonds. Both of these powerhouse nuts are low in net carbs and high in nutrients, making them very #ketofriendly. They both have a natural sweetness to them, so no added sugars, natural or otherwise, are needed in your butter recipe! Almonds and pecans also boast an amazing nutritional profile. (Did you know pecans measure off the charts when it comes to their antioxidant value?)
A 30 gram (1/4 cup) serving of almonds contains:

Calories: 173.7
Fat: 15g
B2 (Riboflavin): 0.3mg | 31% DV
Vitamin E: 7.7mg | 51% DV
Copper: 0.3mg | 34% DV
Calcium: 80.7mg | 8% DV
Manganese: 0.7mg | 36% DV
Phosphorus: 144.3mg | 21% DV
Potassium: 219.9mg | 8% DV
Iron: 1.1mg | 6% DV
Zinc: 0.9mg | 12% DV
Carbohydrates: 6.5g
Net Carbs: 2.6g
Fiber: 3.8g
Protein: 6.3g | 7% DV
Data Source: NCCDB (2)
A 30 gram (1/4 cup) serving of raw pecans contains:

Calories: 207.3
Fat: 21.6g
B1 (Thiamine): 0.2g | 18% DV
Copper: 0.4mg | 40% DV
Magnesium: 36.3mg | 11% DV
Manganese: 1.3mg | 75% DV
Phosphorus: 83.1mg | 12% DV
Potassium: 123mg | 5% DV
Iron: 0.8mg | 4% DV
Zinc: 1.4mg | 17% DV
Carbohydrates: 4.2g
Net Carbs: 1.3g
Fiber: 2.9g
Protein: 2.8g | 3% DV
Data Source: NCCDB (2)
Magnesium, calcium, potassium, healthy fats, and fiber are all very important nutrients to watch while following a #Keto way of eating, making almonds and pecans a perfect complement to the lifestyle.
Soaking & Dehydrating
Most nuts, seeds, grains, and beans are covered in natural chemicals which act as enzyme inhibitors and toxins. These chemicals play a very important role to the live plant, protecting them from predators and prematurely sprouting while growing, but are indigestible to the human body. These chemicals, the major one being phytic acid, must be broken down before consumption for optimal digestion. In the digestive system, phytic acid combines with important minerals in the intestinal tract and blocks their absorption. This inhibits our digestive systems’ ability to break the nut down properly and absorb all of the minerals inside.
Soaking. Soaking your nuts, seeds, grains, and beans is a very simple process that helps to release these toxic chemicals (also known as enzyme inhibitors and anti-nutrients). Once these enzyme inhibitors and anti-nutrients are released, the nuts, seeds, grains, and beans are much easier to digest (did you know this is why you don't toot as much if you eat beans that have been soaked first?), you absorb much more of their essential minerals and nutrients, and they tend to taste much better! Soaking your nuts/seeds also releases the natural enzymes (read all about amazing enzymes here!) locked inside! The process of releasing the enzymes from the nuts/seeds is called germination.
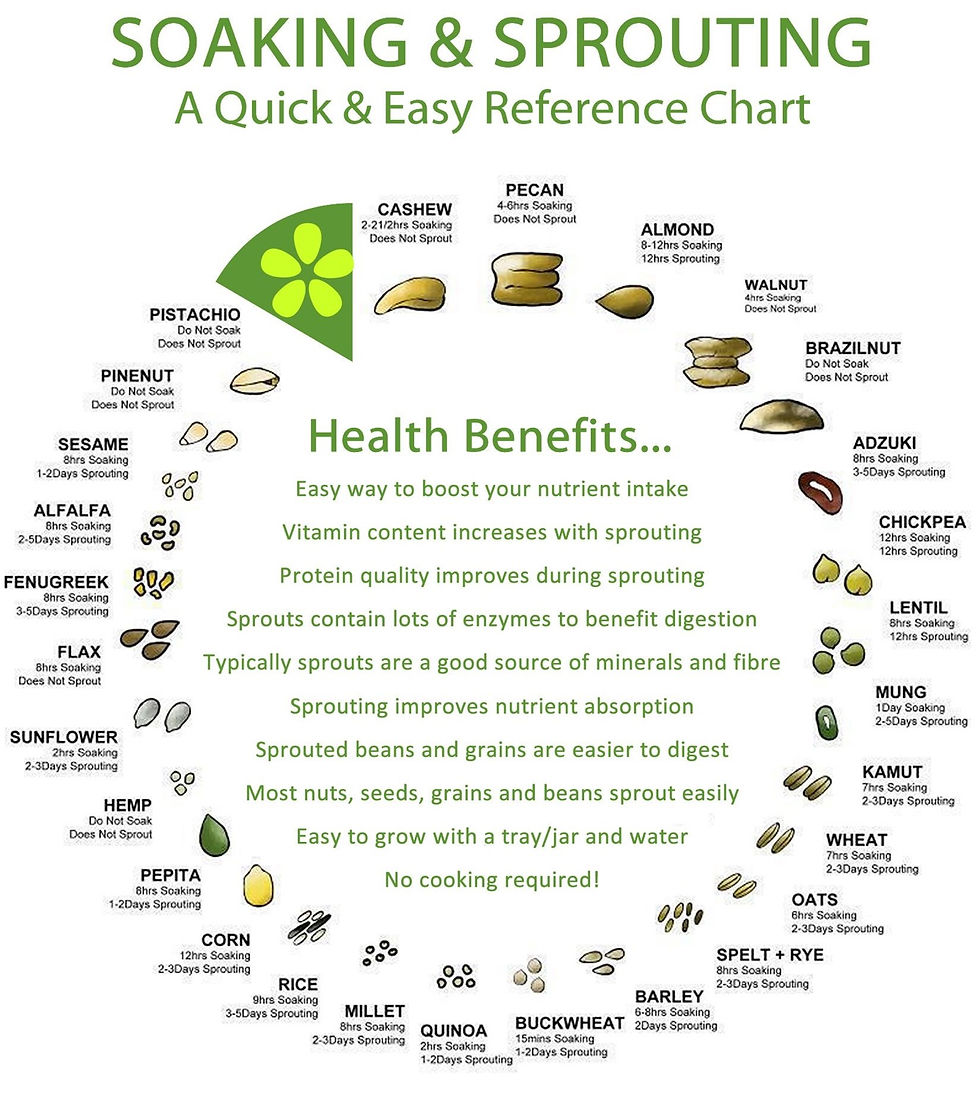
All it takes is some water and salt to soak your nuts/seeds. Simply place four cups of raw nuts/seeds along with a tablespoon of Himalayan pink salt in eight cups of filtered water. Salt is necessary to help neutralize the enzymes. Cover the container with a light cloth to allow the nuts/seeds to breathe and leave it on the counter for the amount of time suggested on the chart. After they have finished soaking, rinse them well in a colander with fresh water, making sure you discard the water you used to soak your nuts/seeds. You can eat your soaked nuts/seeds as they are without drying them, just ensure you store them in an airtight container in the refrigerator and eat them within a couple days or mold will begin to grow.
Dehydrating. If you want to return your nuts or seeds back to the crispy state they started in, which they will need to be to make nut butter, you can dehydrate them after soaking them either in your oven*, the sun**, or a food dehydrator***. I prefer a food dehydrator for the most health benefits and preserving their enzymatic activity. Allow the nuts to completely cool and make sure your nuts/seeds are completely dry as moisture can cause them to mold during storage. You can keep nuts/seeds in jars in an airtight container in the fridge (for up to three months) or freezer to protect the delicate oils present in nuts and seeds.
*Drying in the oven. If you do not have a dehydrator, you can also use an oven at the lowest setting possible to dehydrate nuts/seeds after soaking. The lowest setting on the oven is usually 170° F. After rinsing, spread the nuts/seeds in a single layer on a stainless steel baking pan and bake for 12 to 24 hours, until completely dry and crisp. Check and turn occasionally while baking to prevent scorching. You can also bake them at 350° F for 10-12 minutes. Unfortunately, dehydrating in the oven above 120° F does kill the natural digestive enzymes you released during germination, but you will at least have nuts/seeds free of enzyme inhibitors and anti-nutrients.
**Drying in the sun. You can use the sun during sunny months to dehydrate your nuts/seeds! Prepare your nuts/seeds just as you would for the oven and set it out in sunlight. Keep it covered with a light cloth to keep out dust and bugs and leave until completely crisp and dry.
***Drying in a dehydrator. The benefit of using a dehydrator is it will preserve the healthful digestive enzymes naturally present in the nuts/seeds you helped to release during soaking. Drying in the oven will likely destroy these enzymes. Because you’re drying at a lower temperature when using a dehydrator, this option takes longer but requires no babysitting. After rinsing, spread the nuts/seeds in a single layer in your dehydrator and dry at around 115° F for 12+ hours. The timing varies depending on the size and density of the nuts and seeds, the type of climate you live in, how full the dehydrator is, etc. Make sure the nut/seeds are completely dry and crisp. You can’t over-dry in the dehydrator, but you can under-dry.
Homemade Raw Pecan Almond Butter!
The moment you've been waiting for! The actual recipe! Learn how to make a delicious and nutritious raw pecan almond butter from scratch!

Ingredients
1 cup each organic raw pecans & almonds, soaked & dehydrated
½ tsp sea salt (optional)
1-2 TBSP oil such as MCT, coconut, or olive
Instructions
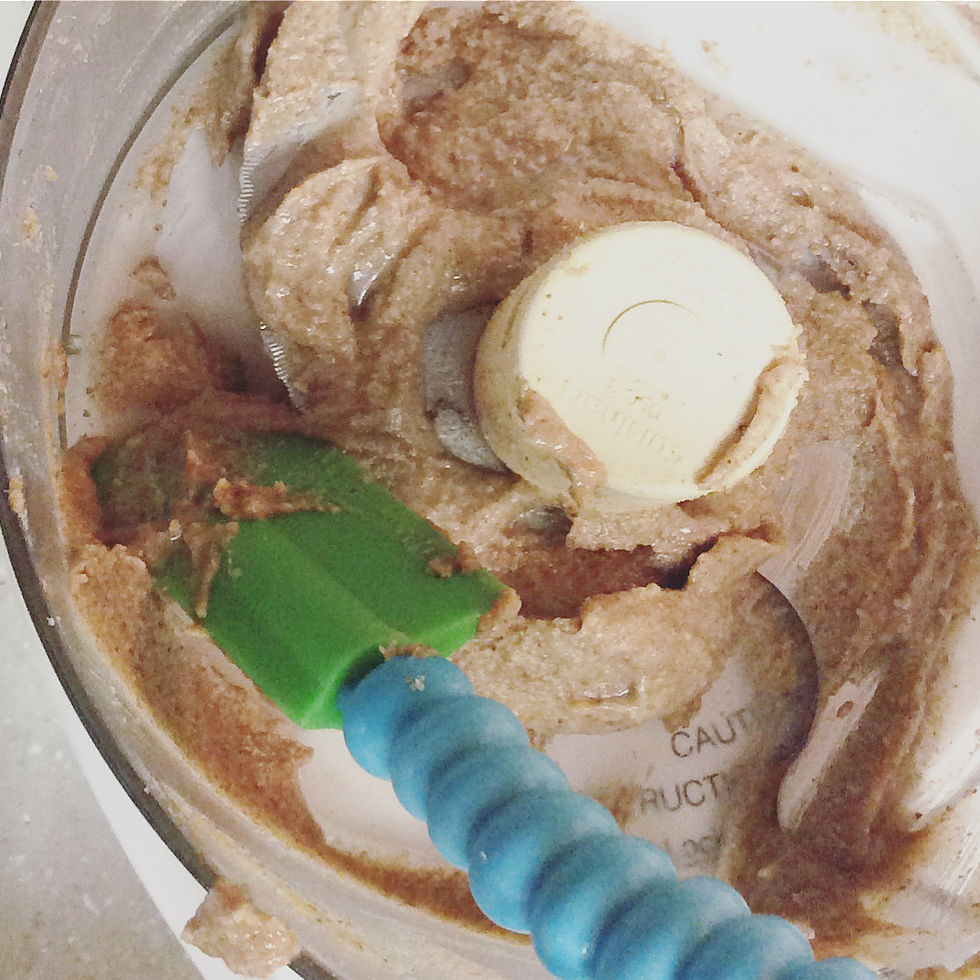
Put the soaked and dehydrated almonds, pecans, and sea salt in a high-speed blender or food processor along with sea salt (optional).
Pulse at medium speed until the nuts are evenly powdered.
Continue to blend at a constant speed. At this point it will be necessary to add the liquid oil to allow for continued mixing. Start with 1 tablespoon and add up to 2 tablespoons in order to reach the consistency you like.
If your blade begins to spin freely, stop the blender or food processor and scrape down the sides, pushing the nut powder down to the bottom. It will likely be necessary to do this several times. Pulsing the nuts until evenly powdered will lessen the chance of needing to do this.
Continue to blend, stopping to scrape the sides when necessary, until you reach the creamy consistency of nut butter! The nut butter will be quite warm and will set up a little bit as it cools.
Notes
Store in a clean, dry, non-plastic container for several weeks. It is best for homemade nut butters to be stored in the refrigerator because there are no added preservatives.
Try mixing it up by adding a drop or two of your favorite Young Living Vitality Essential Oils! The combinations are endless! Cinnamon and nutmeg essential oils are going in my next batch.
Nutritional Facts
Serving Size | 1 TBS
Calories | 110
Fat | 10.8g
Carbohydrates | 2.7g
Fiber | 1.7g
Net Carbs | 1g
Protein | 2.3g
TIPS FOR COOKING WITH OILS

Typically, 1 drop of a citrus oil can substitute for 1 tsp. of citrus zest. If the recipe calls for the zest from 1 citrus fruit, you can use 8–14 drops of the citrus essential oil instead.
For minty oils such as peppermint and spearmint, try substituting 1 drop for 1 tsp. dried mint leaves or 1 Tbsp. fresh mint leaves.
Cinnamon and cassia are pretty similar, and typically what we know as ground cinnamon is really ground cassia; however, the strength of their flavor is quite a bit different. You will want to start by substituting 1 drop of cinnamon for 1–2 Tbsp. ground cinnamon and 1 drop of cassia for 1 tsp. ground cinnamon or cassia.
For herbaceous oils like basil, marjoram, oregano, rosemary, cilantro, dill, etc., start with a toothpick dipped in the oil and stirred into the mixture, and then add more to taste as needed.
Floral herbs like lavender can be used in cooking; but because floral flavors are uncommon, you want just a hint of this flavor. Start with a toothpick, and add more if needed.
For other flavors, a good rule of thumb is to substitute 1 drop of oil for 1–2 Tbsp. of dried spice or herb and 1 drop of oil for 1–2 tsp. of fresh spice. If you think the oil is strong or the recipe calls for less than the above quantities, start with a toothpick dip instead. Taste, and add more if needed.
If you whip some up, share a picture on social media and tag me! Tag @UnboundBethany on Facebook and @Unbound_Bethany on Instagram!
#vitality #cookingwithoils #nutbutter #enzymes #sprouting #breakupwithsugar #sugaraddiction #liveyourlifebydesignnotdefault #keto #sliquein60 #unbound_bethany #unboundbethany #ketorecipes #youarewhatyoueat #naturalweightloss #weightloss #eattherainbow #ketotransformation #tipoftheday
Now go break those bonds and live unbound! #UnboundBethany
Go to https://www.youngliving.com/us/en/referral/1434961 to join my Young Living team and start your wellness journey! #foodaddictionrecovery
Comments